
|
||||
| INDEX | next
|
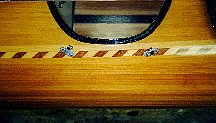 |
Putting
in a rubber foam gasket is the very last thing to be done to the kayak after
varnishing and hardware installation. Closed cell rubber seal or neoprene gasket are essential for long service life. The one used here is 3/8" wide and 5/16" thick. |
 |
The
self adhesive seal gasket fits snugly into the channel groove. Its uncompressed
thickness is almost flush to the surface of the deck. Because of the profile of the channel, the lid compresses the seal only about 70% (in thickness). The partially squeezed gasket can thus maintain its 'shape memory retention' with quick spring back. The molded 'bead' in the seal-channel will allow the lid only so deep as to be even with the deck. This makes it possible to remove it without the help of any handles or hardware. |
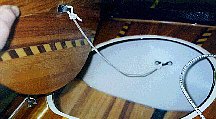 |
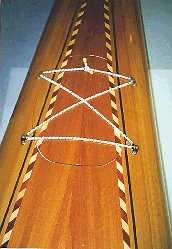
Securing the lid makes sense for obvious reasons but a short tie also prevents the wet lid from dipping in sand and contaminating the seal unnecessarily. |
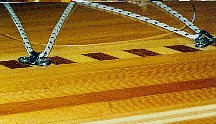 |
I
often use stainless lashing hooks and 1/4" bungee cord to hold the
lid in place. (Defender
marine store has them). Some builders also use wooden eyes/hooks as well as nylon webbing with buckles to secure the hatches. My choice of stainless hooks is for practical reasons. They are of the lowest profile (read: little deck spray) and easily removable for maintenance such as varnishing. Sealing the wood in the drill holes is vital. Matches work well. If you don't care for heavy "stainless" or bulky "wood", check out the super light hardware you can make yourself from carbon fabric. |
 |
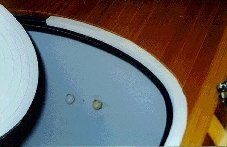
Finished flush bow hatch
with water tight seal. Note of Interest: According to the Ideal Gas Law, the kayak compartment starts with pressure P1, volume V1 and temperature T1. When the air cools down, T2 becomes lower, the volume of the compartment V2 remains the same so P2 must go down for the equation to hold. Now, P2 is lower relative to the atmospheric pressure (P1) so now you got small vacuum in your kayak which holds the lids without any 'strap down' assistance.
(P1 x V1)/T1 = (P2 x V2)/T2 = constant
|
| INDEX |
| Home | Kayak Designs | Kayak Shop | Materials | Kayak Gallery | About us |
| Building Manual | Plans | Sandwich Core | Wood Kayak | Order | |
| Epoxy Test | Abrasion Cloth | Rudder | Resources | Choosing Kayak | Guestbook |
If you notice any problems with the site (i.e. error links, missing images) please, let me know. Thanks
Mail:
Vaclav Stejskal
58 Wood Ln.
Acton, MA 01720
USA
Tel: 781-481-9261
© 1999
- 2024 Copyright Vaclav Stejskal
All rights reserved
Last page update:
9 May 2024