
|
||||
| INDEX | next
|
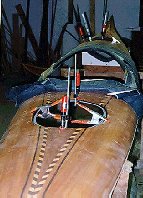 |
The
last step is to roughen the contact area on the deck and to bond the channel
with epoxy putty. If you do this work soon after inside glassing with some
of the 'no blush' epoxies you need not sand it. The bond will be OK. Only 1/16" layer of putty needs to be 'buttered' onto the flange. Since the fit is quite precise, most of it will squeeze out anyway. Light pressure of spring clamps is all that's necessary to hold everything in place. |
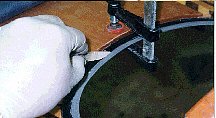 |
A
sliver of rubber squeegee is an excellent tool to remove the excess putty and also to imbed some
of it into the raw wood edge of the hatch cutout. The excess putty is now used to seal the edges of the hatch lids as well. When forced into the wood fibers it creates a smooth sandable edge. 180 grit wet sandpaper takes care of the edges without cutting too aggressively. |
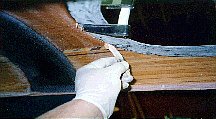 |
Scraping off excess epoxy, below the deck. |
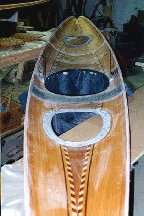 |
Finished
deck inside and out, ready for bonding to the hull. Note the gusset on the right side buttplate. It is much more visible in the large version of this photo. |
| INDEX |
| Home | Kayak Designs | Kayak Shop | Materials | Kayak Gallery | About us |
| Building Manual | Plans | Sandwich Core | Wood Kayak | Order | |
| Epoxy Test | Abrasion Cloth | Rudder | Resources | Choosing Kayak | Guestbook |
If you notice any problems with the site (i.e. error links, missing images) please, let me know. Thanks
Mail:
Vaclav Stejskal
58 Wood Ln.
Acton, MA 01720
USA
Tel: 781-481-9261
© 1999
- 2024 Copyright Vaclav Stejskal
All rights reserved
Last page update:
9 May 2024