
|
The Epoxy Test Results |
Epoxy
Panel exposure after:
|
| Let me point out that the comments in this entire page reflect only my opinion based on my experience with the tested epoxies. I am in no way affiliated with any of the manufacturers. I try to be as fair to the different brands as possible because like most boatbuilders I take pride in my work and finding the best material for my kayaks is the whole point of this test. Whether free, cheap or expensive, if it doesn't cut the mustard, I won't use it! |
| |
|
|
| Viscosity
is a measure of how free flowing a liquid is. The more syrupy and thick
the liquid, the higher the viscosity. This is one of the more important issues in wood strip construction because low viscosity epoxy allows thorough penetration of the fiberglass thus making it completely transparent over the wooden surface. Even though 100% saturated fiberglass is important, a far more important structural concern is how deep the epoxy soaks into the wood. Thick and fast setting epoxy will not saturate the top layer as deep, making the surface softer, less abrasion resistant and more prone to delamination on impact (the break of bond between fiberglass and wood core). Viscosity in thicker epoxies can be improved by preheating both the resin and hardener prior to mixing. Warming the cans in hot water, on a radiator, or by infrared heat lamps are good ways to lower viscosity. This may shorten the pot life (working liquid stage) somewhat but it will be far easier to saturate the cloth, so the job will go faster. The other side of the coin is that thicker epoxy will make a better filler of the fiberglass weave while the thin resins may take more coats to accomplish the same thing. Check out the fiberglassing section in the kayak shop |
| The 4oz. cloth on the test panel is so tightly woven (40 x 40 per inch) that it tested the saturation power of the epoxies to the limit. What I mean by this is that sometimes the fibers running in the warp or weft direction saturate less - let's say 98% - and are more visible. Even though a tight weave fabric is lighter weight (4oz.), it may be harder to wet-out every last strand of it, than loose 10oz. fabric. I personally use the 4oz. 22 x 24 thread count cloth on the deck and this less expensive, tight weave on the inside of the kayak. |
| Viscosity |
|
|
|
|
I chose all epoxies mainly for clarity so all of them are clear in thin coats as well as under varnish, but they all differ slightly by hue. Thick coats are a different story so check out the full size samples. The only non-colored epoxy is WS 206. The rest ranges from yellows, green, and pink. |
|
|
|
If you are into production or want to get things done reasonably fast, you
will be happier with faster curing epoxies. If, on the other hand, you feel
apprehensive about epoxy setting up too fast or there is no rush to blast
through fiberglassing, then the slower types are for you. Some manufacturers
give gel time at higher shop temperatures (up to 77°F) . My shop is
65°F. Some epoxy formulations allow mixing of slow and fast hardeners to adjust the setting speed but you will have to invest in two hardeners and spend more time (and epoxy) for experimentation. The tested epoxies that allow hardener mixing are:
|
 Click on pictures for detail |
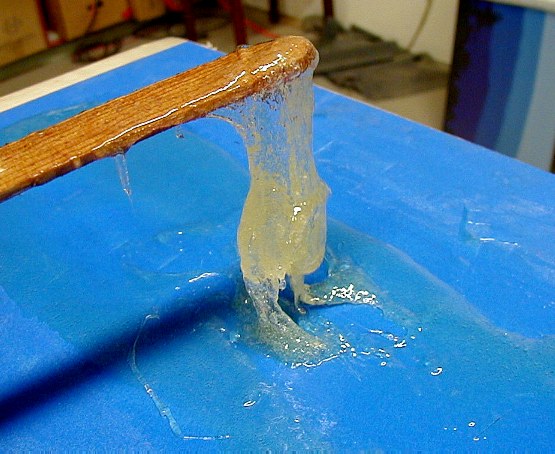
'Gelling' of System Three (medium hardener). This batch was intentionally
thickened for 'pre-preg' construction of carbon fiber rudder
brackets. The 'Alien Slime' consistency shows the phase change as liquid
starts turning into solid. This happens within a few minutes at this point.
One would expect uniform thickening but in reality, denser clumps start
to form where the reaction heating in the cup was the highest. The temperature of the epoxy is around 120°F (49°C) and it starts 'steaming' visibly. |
|
|
|
|
All epoxies were ordered on-line and only WS 206 and 207 could be obtained locally. The prices reflect the best deals I could find in the winter '99-'00. Shipping cost are not included. To make a fair comparison, the prices were calculated for 1.5 gallons of usable epoxy mixture even though some epoxies do not sell that way or the mix ratio is different than 2:1. |
| Prices
per 1.5gal ( 3.785 L) (US$) |
The Resources page has links to all merchants. Some dealers will demand high hazardous shipping fees even though the epoxies are classified as nonflammable and can be ordered from other places without any fees, so 'caveat emptor'. None of the above dealers charge hazardous fees for these epoxies. |
|
|
|
When some epoxies harden,
a byproduct of the curing reaction rises to the surface appearing as a
greasy, waxy film. On contact with high humidity or water, this coating
turns into an opaque white smudge (during or even after cure) which turns
into dry chalky powder with time. This 'blush' will not wipe off easily
with thinners or solvents. It can only be dry or wet sanded after the
epoxy completely cures. |
| Blushing |
|
| Click
on this thumbnail image to see the test panel from an angle that reveals
differences in the epoxy surface. |
This
image shows in detail the unflattering look of epoxy blush. |
What
is Blush? - technically speaking
|
|
|
The greasy films that appears
on some epoxies are largely the salts of amine carbonate. Depending on the
type and formulation of the epoxy, amine compounds on the surface combine
to various degrees with CO2 (carbon dioxide) and water in humid air forming
hydrates of amine carbonate. This stuff is supposedly water soluble but
it will not leave without some abrasive scrubbing. Why do some epoxies blush and some don't and why wouldn't everyone want to make non-blushing epoxies? It just happens that the amount of blushing is very related to the shape of the amines . These molecules in turn determine the physical properties of the cured epoxy. Low blush epoxy formulations often contain 'cyclic amines'. The geometry of these molecules as well as their 'monofunctionality' (one reactive side only) improve the surface, slow down the cure rate and reduce the strength of the cured mass. What does it all mean? It seems that very slow, glossy, low blush epoxies harden to solids with lower moduli of elasticity (softer and more elastic) which allows for deformation and better impact absorption without cracking. Faster setting, blushing epoxies are generally far stiffer, harder as well as more brittle. At the extreme of this spectrum lie high moduli epoxies which are never used for clear coating but are unsurpassed in their strength. These epoxies are used in high tech, high strength composites that are post-cured with heat. |
|
|
|
The results of the 'year long' epoxy test are now in. The info in the table below describes what features I like the most and least in each type of epoxy. |
|
|
|
|
This issue is a compromise
you need to consider before investing in any 'Epoxy system'. |
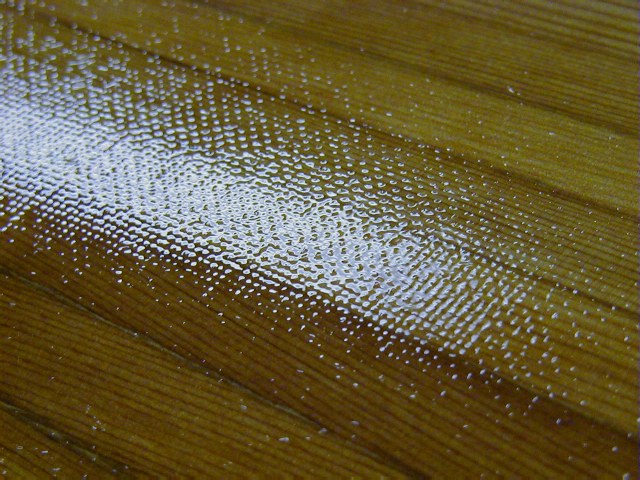
Click on pictures for detail |
This
picture shows the fiberglass weave after squeegeeing the first filler
coat (MAS epoxy). This is how it should look but it doesn't last long because
it was put on top of barely cured substrate only 3 hours later. The hardener is a blend of 20% fast and 80% slow. |
|
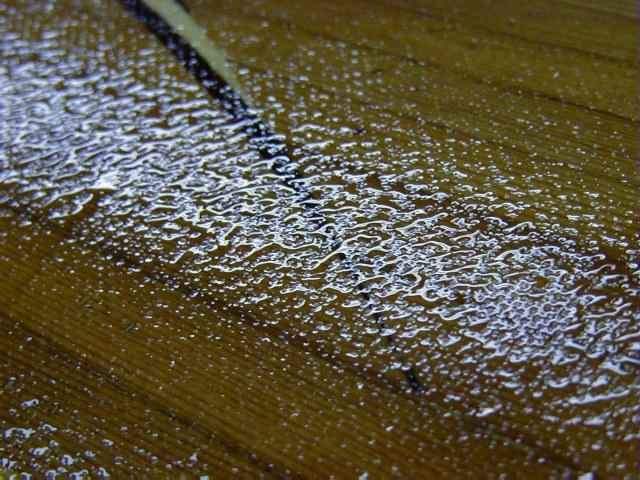 |
This is the same patch of surface as in the picture above only few minutes
later. I am puzzled by this myself but it seems like the uncured epoxy wants
to repel the new coat in the same way a new car polish beads up water. Good
ol' surface tension at work. This 'beading' actually became an advantage because the next filler coat really filled the deep valleys between the high beads and it saved me from applying the last coat. It took 3 coats in total to cover the deck. |
|
|
|
When I tested the different
epoxies, I wondered what would happen if leftover batches from different
brands were mixed together. At first I imagined that some violent reaction
might take place or that the mix would turn into sludge that never hardened.
I was very surprised to find out that all three combinations (out of 15
possible permutations) cured completely as if it was one brand. |
|
|
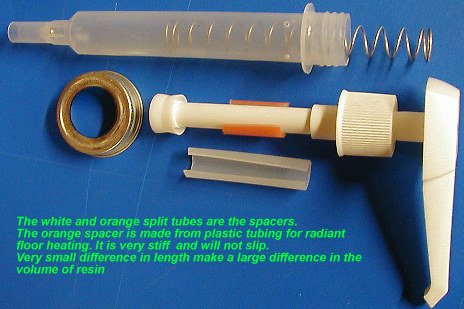 Click picture for detail |
Epoxy pumps are a great
time and labor saver during fiberglassing but many epoxy merchants will
warn about testing the accuracy of the pumps prior to using them. OK, so
you test the pump and find out that it is inaccurate. Do you throw it out
only to find out that the next one you order is just like the previous one?
The problem is that the larger hardener pumps ( for gallons and quarts)
have a fundamental design flaw in that they can be rigged for two
settings. When you unscrew the top and pull out the plunger you will notice
a lengthwise split spacer (tube) that prevents the plunger from retracting
all the way to the top. This limits the amount of hardener the pump can
take up. Check whether the spacer hugs the plunger stem only. If
it is, then it is the way it should be (although there is no assurance that
it will stay that way). Sometimes the split tube is forced over a thin collar just behind the plunger making the spacer effectively shorter. This makes the pump deliver more hardener which is what you definitely DON't want!! Pushing the pump hard may easily change the setting from good to bad without you knowing. The solution: Wrap a wire tightly around the spacer before the plunger or make your own spacer with hard stiff tubing. I would advise against metallic spacer for it may alter the color or chemistry of the hardener in the long run. I haven't tested the hardener - metal reaction so it is a pure guess on my part. If you try it and it works, I would love to know. Don't feel like messing around with pumps? Pumps are good only when you work with one or two epoxy types and only certain size containers. If you work with more epoxies, many different size containers OR you mix both large and tiny batches AND you like to mix slow and fast hardeners to customize the cure time, pumps are just a hindrance. The pictures below show how to make an inexpensive, accurate and flexible epoxy dispensing system. I use this more often than pumps. Ten to twenty cups are enough to take you through the entire kayak fiberglassing process. First decide on the size of the epoxy batch you want to work with. It can be as big or small as you like. I also chose 2:1 ratio epoxy for this example but you can adopt it for any ratio system. |
 |
 |
 |
|
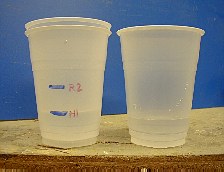
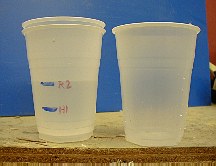
| . Place an empty cup (a) into your 'gauge' container and mark off the level of the hardener (H1). Pour water to the mark. | Pour the first measured portion into another cup (b) and refill the cup (a) back to the H1 level. | Now pour cup (b) back into (a) and mark the level on the 'gauge' container. This is the level for the resin (R2). Now your gauge cup is calibrated to dispense 2:1 portions of epoxy. |
| The last thing you need are dedicated resin and hardener cups to be placed into the 'gauge' cup for refills to the proper level. Pour the measured portions into your mixing cup so that you can reuse the dedicated cups over and over. Don't forget to mark the containers 'R' and 'H' so that they don't get mixed up. The gauge cup will work well until it gets gooped up with too much epoxy and the cups will not fit in accurately. |
|
|
| Most people clean epoxy with thinners such as acetone. Because of its toxicity, expense, and fire potential, I try to limit its usage only for cleanup and soaking of brushes or tools that are used immediately. Since epoxies are fundamentally alkaline, (like lye-sodium hydroxide or baking soda-sodium bicarbonate), they can be neutralized by acids such as vinegar. While acetone thins the epoxy (when it evaporates, a sticky film remains) vinegar neutralizes the epoxy completely and with it its toxicity (new chemical is formed, no epoxy remains). Vinegar is cheap non flammable and removes uncured epoxy completely. Because of its acidity, don't use it to clean the hull or surfaces to be re-coated! |
| Home | Kayak Designs | Kayak Shop | Materials | Kayak Gallery | About us |
| Building Manual | Plans | Sandwich Core | Wood Kayak | Order | |
| Epoxy Test | Abrasion Cloth | Rudder | Resources | Choosing Kayak | Guestbook |
If you notice any problems with the site (i.e. error links, missing images) please, let me know. Thanks
Mail:
Vaclav Stejskal
58 Wood Ln.
Acton, MA 01720
USA
Tel: 781-481-9261
© 1999
- 2024 Copyright Vaclav Stejskal
All rights reserved
Last page update:
9 May 2024