
| << back | INDEX | next >> |
|
|
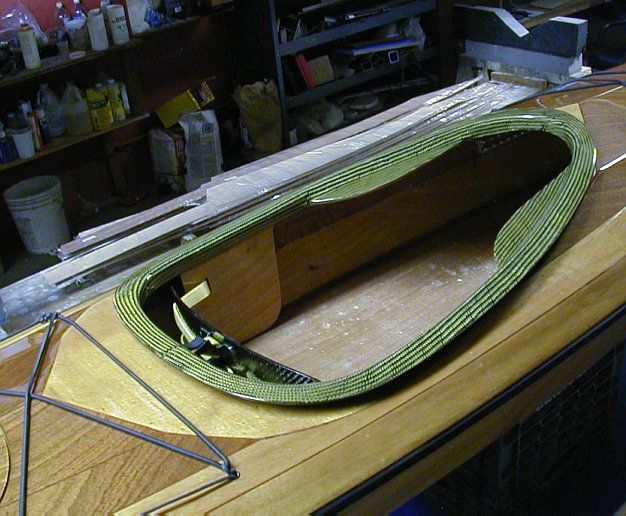 |  Construction technique of recessed cockpit on Cirrus SLT. Plywood for recess not currently available in any kit. Plans for recess cockpit by request. |
| |
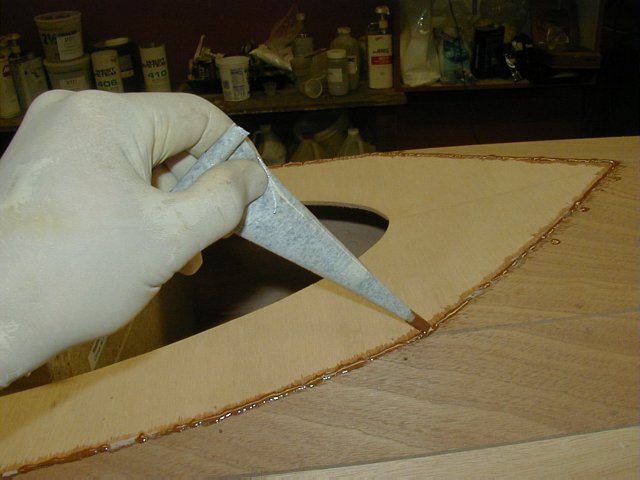
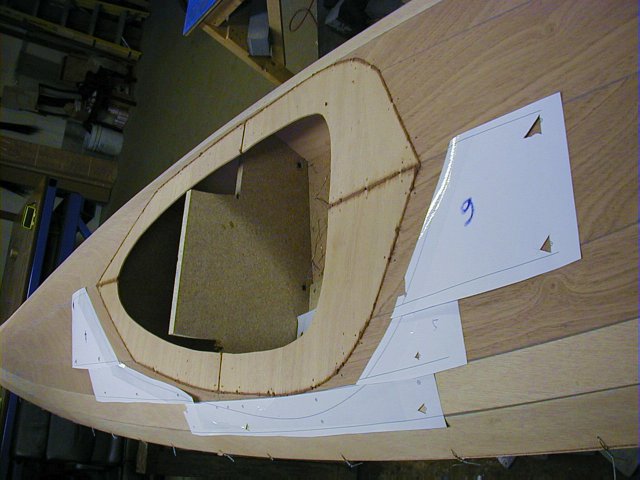 | First, ignore the already made recessed coaming in the photo. It was a prototyping test to make sure that the principles of this method worked and everything was going to fit as planned. It came out well, so now onto the real thing. By far, most important step in the process is to lay out and cut the opening to the proper shape. The hole should ideally be shaped so that it nicely accommodates the recess insert which is a slightly bent flat sheet of plywood (or wood strip surface) so that the edges of the insert and the hole meet nicely everywhere and the panels can be wired tightly without gaps. If you are planning to make your own recessed coaming on different kayak model (plywood or strip), the opening is a bit tricky to estimate when you consider that the insert must intersect many surfaces converging at different angles and elevations or in the case of a strip kayak, the surface is a compound surface. Every kayak deck shape will have different opening and in the shop environment an educated guess and trial and error are the only guides to refine the cutout shape. More on this below. The paper templates in the picture define the hole for the cutout. Each template is positioned exactly in reference to the wire drill holes on the deck panels. |
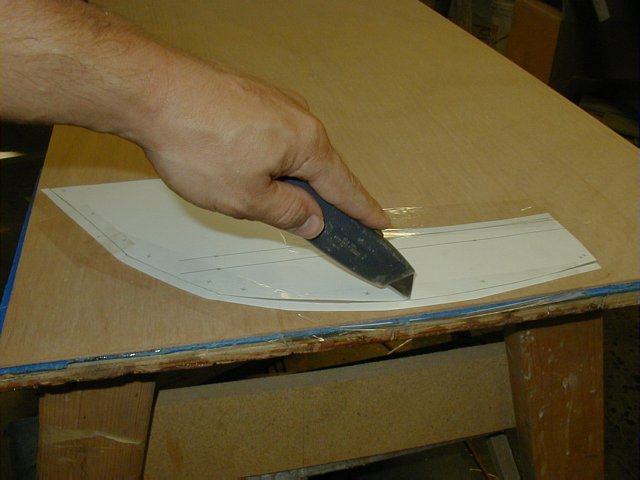
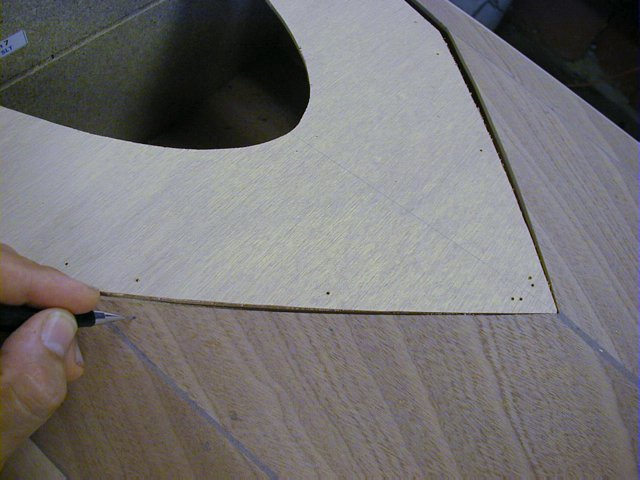
 | The templates are marked so that they can be easily positioned on the deck plates in the right place and aligned to the drill holes. Once in position, tape them firmly to the deck through the triangular hole openings and along the edge. Use clear packing tape. Do one template at a time to assure accuracy and slice along the line on the template to transfer the outline to the deck plate. Press hard enough on the sharp knife to mark the plywood clearly. |
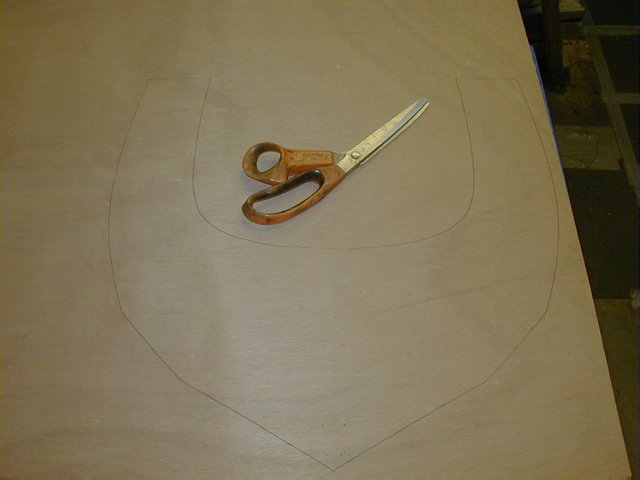
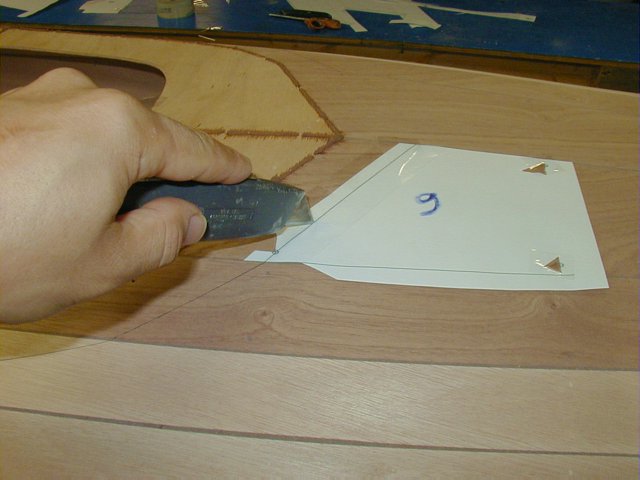 | A detail of another template. The template is positioned by a minimum of three markers that should coincide with the drill holes in the deck plate. The wire holes will be filled with filler at this point but they are clearly visible for this task. A triangular "window" is cut into the paper template at each drill hole marker so that one side of the triangle passes through the middle of the point marker. This way, you can position it exactly over the drill hole on the deck. |
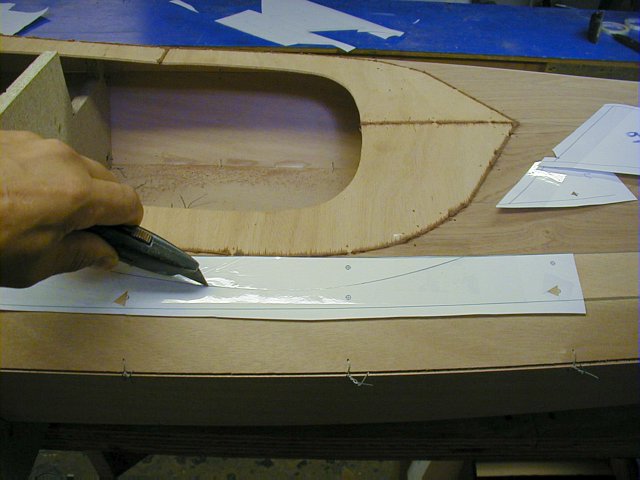
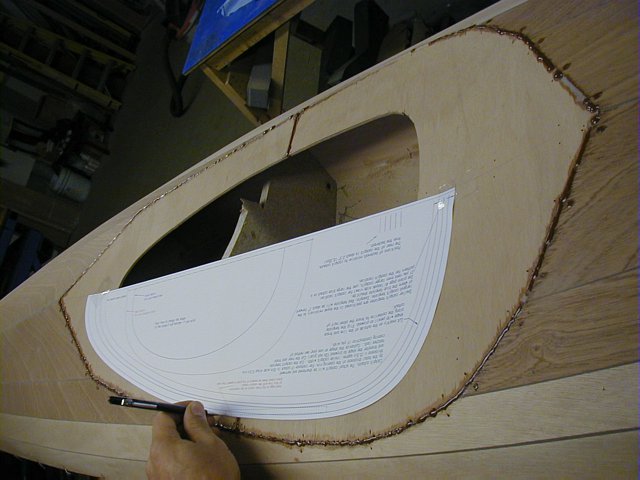
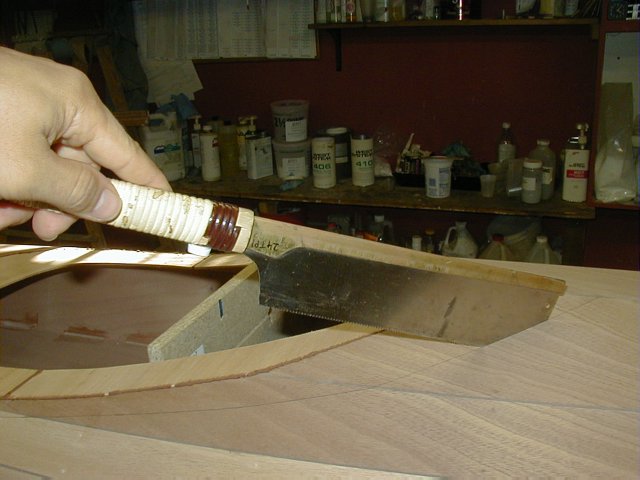 | When all outlines of the opening are marked with the knife, you can accentuate the line visibility by a pencil. Use a pull saw as shown here or a jig saw with plywood cutting blade to cut the recess opening. The ideal pull saw for this or any strip work has 22 to 24 teeth per inch. |
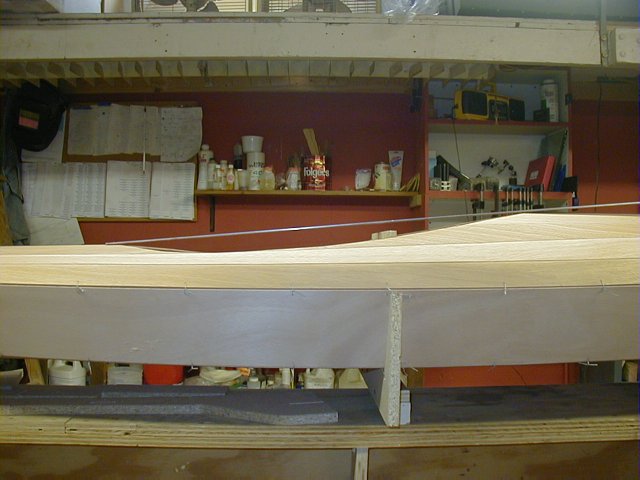 | Looking at the profile of the recess hole from the side. Notice that it forms a nice smooth and fair curve in relation to the straight ruler sitting on top of the deck. This is the curve that the coaming will assume later. As I mentioned, if you are making the recess in the shop environment without any templates, the outline of the hole is going to be established by trial and error. The best way to approach this is to establish the very front and rear of the recess hole in relation to the cockpit cutout. The distance from the rear cockpit cutout to the back of the recess hole should be about 3.5 to 5.5 inches (8,9 to 14cm). OK. Now let's mentally establish the hole boundary. Look at the kayak perpendicular from the side (as in the picture) and visualize where and to what depth you want the coaming and therefore the cutout to be. Take a wide masking tape and and run it along your imaginary curve as you look at the side of the cockpit. Now take a pencil and draw the curve on the tape so that it looks nice and smooth from your side view perspective. Make some dots in few key places and then fill in more dots and then connect them with curves. This method projects the curve onto the deck surface. You may be surprised at the shape of the drawn curve when you view the deck straight from the top (birds eye perspective). The top view will let you smooth out any small deviations of the curve but the side view will establish the overall shape of the recess. When you are happy with the curve make a mirror image copy on the other side of the deck symmetrically using compass and measuring tape at any good reference points like wire holes or plate boundaries. The centerline of the deck is the mirror plane. |
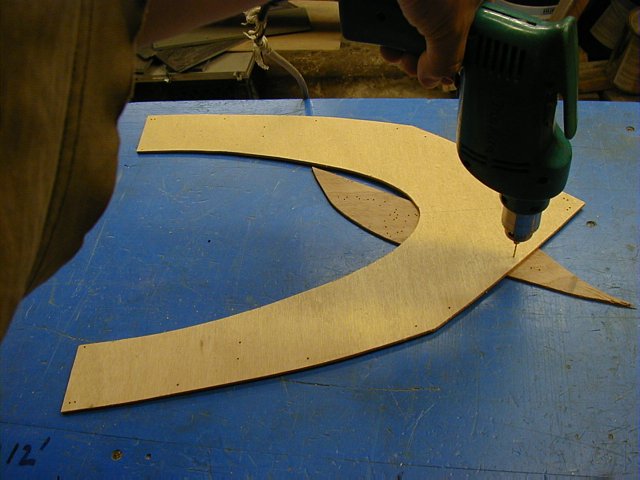
 | Now, continuing with the Cirrus SLT recess. Place the recess template on 4mm plywood so that the grain of the top layer runs perpendicular to the template centerline (under my wrist in the picture). This is so that the plywood is most flexible in the direction along the length of the kayak and can be nicely bent into the recess. Tape the paper down with clear tape, indicate the wire holes with a nail and cut along the lines with knife. Flip template along its centerline and do the mirror image side. |
 | Rear recess plate outline on plywood. Cut the shape out so that you have one whole front and one whole rear piece. If you do not have paper plans to make the exact shape, use thin flexible cardboard or cheap plywood to make a rough oversize template. Bend the rough cut plate into the recess hole and scribe boundary lines from below onto the oversized plate. Having extra hands available to hold the bent plywood in the recess hole while you are transferring the recess outline will be very helpful. Trim the recess plate along the lines with a jig saw. Since you can't see the line as you scribe it along the shape of the recess hole, it is not a bad idea to cut the plate oversized by couple millimeters on the outside of the lines and then sand the edges to fit. When I make errors, I feel much better to err by oversizing so it is easy to fix. If you use wood strips to build up the recess, it is very simple to build the recess plate strip by strip and cut each strip to fit into the hole as you go. Tip: use thin and very flexible scrap plywood or cardboard to make a well fitting template first and then transfer the shape onto the 4mm marine plywood. Making a mistake is far cheaper on door skin luan or cardboard than on expensive 4mm 1088 Okoume. For the recess, I recommend marine plywood as it has thicker outer plys and is thus very flexible in the direction that is perpendicular to the direction of the surface grain. |
 | Here is the front recess plate. I am marking new drill holes on the deck opposite to the holes in the plate. |
 | Drill all holes in plate and deck. Size 1/16' (1,5mm) drill. |
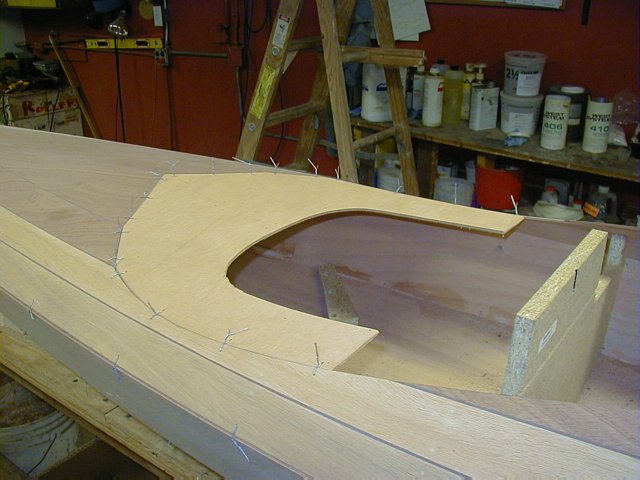 | Wire recess plate into opening. Stitch in the CirrusSLT plate loosely all around. Push on deck plates carefully to bring the edges together and tighten wires evenly on both left and right sides until the deck and the recess plate adopt to each other. The terminating deck plates within the cockpit are relaxed and do not correspond precisely to the mathematical surface of CAD thus the plates need to be gently persuaded to where they should be rather than where they want to be. The joint between the recess plate rear and front pieces may need to be sanded down to fit snugly. Remember, oversizing is good. |
 | When at first you see the hole in the kayak with the precut templates superimposed, the fit looks improbable but when all is wired tight, it comes out nicely. |
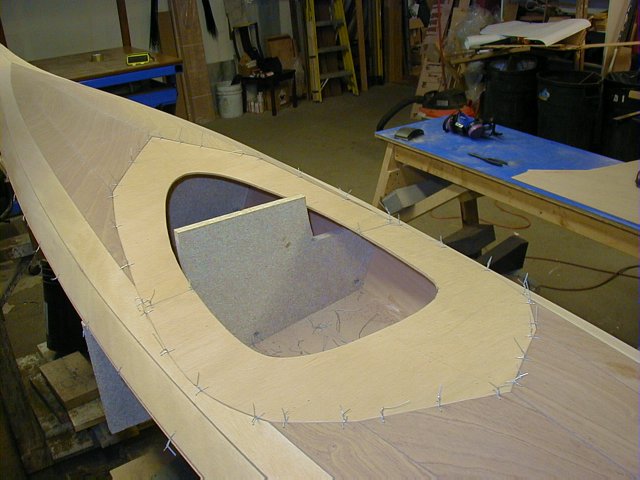
 | Fillet everything like you did on the deck plates. |
 |
I never mentioned the location of the front of the recess hole so here are a few considerations that will affect its placement. If you are working on the Cirrus SLT, it is very easy. The recess templates are already marked to align in specific places so there is no planning or layout work involved. Just follow the directions on the plans and tape the cockpit cutout to the centerline indicated on the recess plate as show in the photo. If you are improvising or making a recess on any kayak.
|
 | Drawing the knee braces. On the SLT this template is part of the cockpit cutout otherwise you can be totally creative here. Also, it is worth mentioning that the recess curvature (looking from the side) will effect the curvature of the knee braces themselves and their slope with respect to the baseline. I recommend to keep the recess plate rather flat in the area of the knee braces. One way or another, the knee braces will most likely receive Minicel padding to conform to the knees and thighs. This will give you more contact with the kayak and more responsive control in vigorous maneuvers. |
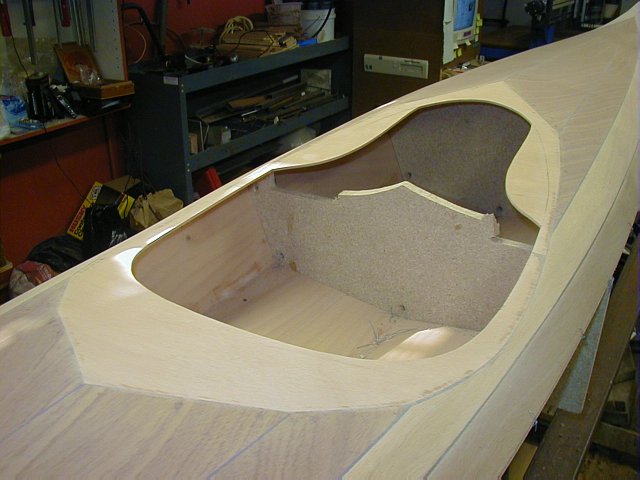 | Now that the cockpit opening and kneebraces have been cut out and all fillets between the panels filled and sanded smooth, the deck can be fiberglassed Next comes the installation of the vertical coaming rim. Note that this method of recess construction is only one of many possibilities. Instead of plywood, the recess opening can be spanned laterally with strips as shown on this page by one builder of the HybridLT or by quite advanced "radial stripping" seen here. Even though both instances show strip deck, the recess construction is essentially identical on a plywood deck kayak. |
| << back | INDEX | next >> |
| Home | Kayak Designs | Kayak Shop | Materials | Kayak Gallery | About us |
| Building Manual | Plans | Sandwich Core | Wood Kayak | Order | |
| Epoxy Test | Abrasion Cloth | Rudder | Resources | Choosing Kayak | Guestbook |
If you notice any problems with the site (i.e. error links, missing images) please, let me know. Thanks
Mail:
Vaclav Stejskal
10 Colonial Court apt. 73
Stoneham, MA. 02180
USA
Tel: 781-481-9261
© 1999
- 2020 Copyright Vaclav Stejskal
All rights reserved
Last page update:
11 January 2020