
|
||||
| INDEX | next
|
 |
The
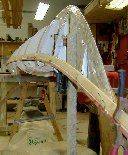
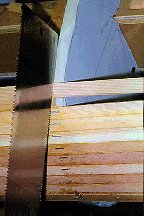
bottom of the first sheerline strip is aligned with the sheer marks at the stations. This line
marks the split between the hull and the deck. The kayak is also at its widest around the entire
perimeter. I like to have the hull sheer strip point with its cove down so that the first deck strip locks in easily. Since the coves should point up for easy glue application, the sheer strip can be made 'double coved' or two strips can be glued 'bead to bead' with the beads cut off. |
 |
The
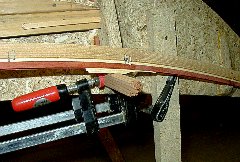
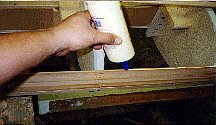
sharp curvature of the upswept bow can make bending of hardwood or wider strips a bit more difficult.
A piece of wood is clamped horizontally to the station to facilitate bending while keeping the sheerline where it should be. The white piece of wood is a 'bead' to protect the cove from being crushed. The reason for doing it this way is because the staples are not strong enough to hold the bent strip in place. The vertical piece of particleboard clamped to the bow station allows to correct any twist of the bow. This can be an issue before this section is sufficiently stiff. |
 |
One
way to start is to attach the strips alternately on either side until the mold assembly stiffens
(5 courses of strips or so). Note that a groove must be cut into the cove of the opposite strip so that the intersecting strip can be fully seated. Don't spend much time on this if you plan to attach a stem band later on. |
 |
This
alternating style is the simplest. The first strip of a new row sticks out and the counterpart is
shaved to fit the angle. The next row is done the same way except the sequence of the strips is
reversed and so on... Because of this shallow 'dovetailing', the stem is very strong. This style can be carried well onto the bottom. A faster method is better suited to finish the flatter parts of the hull. |
 |
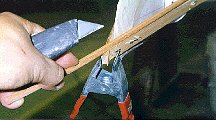
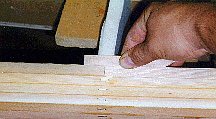
When
two shorter strips meet somewhere in the middle of the kayak (and most will), prepare both strips
by shaping the stem ends first. Dry-fit them into position until they seat properly ( at
this point, both are longer than needed). Pull both of them out and run a bead of glue under the
first strip. Staple it down from the stem towards the middle and cut it in the center of the chosen
station. Do the second strip the same way from the other tip and when you get to the station, trim off the excess as in the picture. A bit of practice will make for no-gap joints. In flatter areas, these joints needn't fall directly on the rim of the stations. This will stagger the breaks and lets you use odd lengths and leftovers. |
 |
The
upward pointing coves save an enormous amount of time and glue. Run a bead
of glue the entire length of the kayak only after the strips have been dry
fit and are ready for installation. There is not much time to experiment
before the glue skins over. Check out my cautionary note to avoid unsightly strip "print - through" |
 |
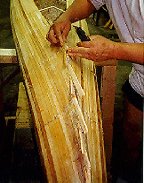
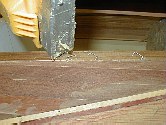
A finished 'butt joint' waiting to be stapled. Use scrap pieces to press the strips together. This is the only way to assure solid contact between the rows of strips and also to protect the fragile coves. |
 |
In some situations, it is necessary to staple two adjoining strips together to prevent them from pulling apart and creating a wide gap. You may encounter this when doing intricate inlays in areas of high twist. The best technique for this is to drive the staples at a low angle through both strips. Stapling squarely across the joint does nothing to keep the strips compressed together. |
| INDEX |
| Home | Kayak Designs | Kayak Shop | Materials | Kayak Gallery | About us |
| Building Manual | Plans | Sandwich Core | Wood Kayak | Order | |
| Epoxy Test | Abrasion Cloth | Rudder | Resources | Choosing Kayak | Guestbook |
If you notice any problems with the site (i.e. error links, missing images) please, let me know. Thanks
Mail:
Vaclav Stejskal
58 Wood Ln.
Acton, MA 01720
USA
Tel: 781-481-9261
© 1999
- 2024 Copyright Vaclav Stejskal
All rights reserved
Last page update:
9 May 2024