
|
||||
| INDEX | next
|
 |
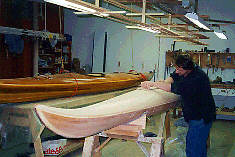
There
are two ways to smooth the surface in preparation for fiberglassing. The
ridges between the strips can either be planed or beltsanded. Both methods
have their pro's and con's. I used to plane everything initially but found out that 50grit beltsanding produces uniform finish much faster than any plane. It may sound more dangerous but it is not so. This type of sanding is done only to knock down only the grossest roughness anyway. If you want a mirror-like surface on your kayak, the rest must be done with the fairing board. |
 |
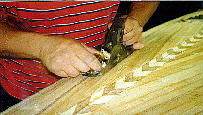
Here,
the Cape Ann Expedition gets the 'plane'
treatment after some spot-filling. While beltsanding is faster AND doesn't
discriminate between hardwood or softwood the plane does shave the pores
left by the staples very cleanly, so the filler penetrates deeper into the
wood. The first filler round is mainly devoted to filling colored wood with oil based filler which stains the surrounding wood and is hard to sand out. The major staple hole filling with water based filler happens next. |
 |
This
photo shows smoothing work on the inside of the kayak. Of all tools I have
tried, a humble paint scraper gives the best results especially in the tight
curves of the chines. The shape of the blade and a special technique turn
it into a superb spokeshave. Trying to use it like a traditional paint scraper
doesn't work! Note the long curly shavings made by it. The next best tool is a 7" coarse sanding disk on a drill. Working with planes on the inside is too inefficient (even with a rounded base). |
 |
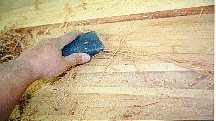
All
filling of gaps and staple holes is done right after coarse sanding (planing)
but prior to the fairing board. Waiting to fill everything until the fairing board job is done would require more sanding anyway. This time, however, the temptation is to remove only the filler smudges at the stations. What you don't see are the hollows that your sander is making right under your nose. The varnish will reveal a nicely rippled and uneven surface. With that said again: fill gaps and staple holes as early as you can! |
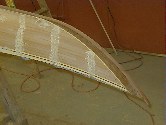 |
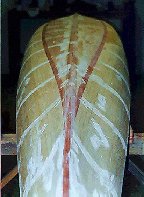
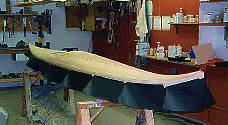
The bow of the Expedition. The dark Western Red cedar and Redwood were filled carefully so that the filler would not contaminate the pine and the light wood. |
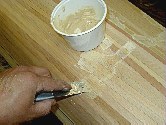 |
Water based fillers are the most forgiving of mistakes and can be used right up to the fiberglass work. Oil based fillers are OK but must be used early on so as not to leave oily stains (thin with acetone). Epoxy fillers are the worst by far. If you want to use epoxy putty you might as well seal the entire surface first with epoxy, then use the putty, and then sand the whole thing before glassing. It is simply too much work for little return. A water-based three component mix (photo) (Durham Water putty, WS110-phenolic microballoons, wood dust) The whitish haze left after this filler completely disappears under the epoxy resin. Most other fillers are NOT that forgiving and you will have to sand the stuff out of the wood. Both Oil based fillers as well as epoxy filler, will leave a distinct spot of different hue if left on. |
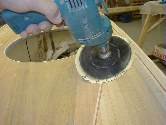 |
The
inside hull is scraped, filled and sanded with the orbital sander. A sanding
disk can be used in addition to or instead of the scraper but it will be
very dusty. The 7" sanding disk (60 grit) contours the inside radius
very well. Most inside work will be more tedious because tools don't seem to like concave surfaces. The quality of the job often reflects that. The saving grace seems to be that only the cockpit floor will be visible to your critics. |
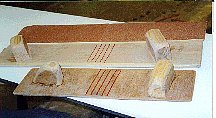 |
Fairing
boards. The most important tools for achieving the smoothest and fairest of surfaces. The red
lines indicate the direction of grain at the surface of the plywood. This configuration allows for
flexibility of the board and lower pressure on the sandpaper in the middle. The longer board fits two half sheets and is made of very flexible 1/4" plywood. It is used with finer grit (60), floor sanding paper for finish sanding before glassing. The shorter one is stiffer and is used for fast stock removal (40). |
 |
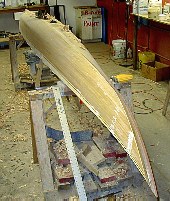
Final touches with the fairing board before masking and glassing. |
 |
.Ready
for fiberglass.
|
| INDEX |
| Home | Kayak Designs | Kayak Shop | Materials | Kayak Gallery | About us |
| Building Manual | Plans | Sandwich Core | Wood Kayak | Order | |
| Epoxy Test | Abrasion Cloth | Rudder | Resources | Choosing Kayak | Guestbook |
If you notice any problems with the site (i.e. error links, missing images) please, let me know. Thanks
Mail:
Vaclav Stejskal
58 Wood Ln.
Acton, MA 01720
USA
Tel: 781-481-9261
© 1999
- 2024 Copyright Vaclav Stejskal
All rights reserved
Last page update:
9 May 2024