
|
||||
| INDEX | next
|
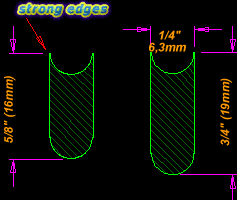 |
This
is what a normal bead and cove wood strip should look like. It is important
to mill it a fraction over 1/4" which is about the thickness
of the lines on carpenters measuring tape. A reading on a caliper would
make it 0.275inch (6.9 mm). Thin cove edges just crumble into the glue line as you run the glue bottle and you have to fish out the splinters for the strips to get good contact. Strips can be made in any width (1/2" - 1") but I highly recommend to mill 5/8" strips mostly and 3/4" if the wood is very pliable. They may not cover the surface as fast as the 7/8" but they bend far better and conform very well to convex and concave compound surfaces. The harder the wood the more important this becomes. This factor alone will make stripping faster and kayak models with harder chines, pinched keels or small radius curvatures (like the deck bow and stern) can be built that much easier. Once you are set up, you can mill two or three different strip width to cover flatter areas faster and tighter radii easier. If you order strips, you can get different widths as well. How to calculate the footage of strips for your project. |
 |
Strip
milling problems |
 |
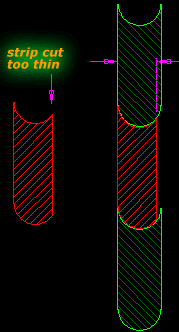
This
problem arises from poorly adjusted router fence, low finger board pressure
on the strip or a strip that is pushed through the router too fast. A large void in the glue joint is the result. This may not be too serious if the void is filled with glue but it often isn't which makes the wood core weaker. Too much glue just adds pounds to the kayak. With time, this problem may cause ridges printing along the joints through the fiberglass skin. See 'print through' problems. |
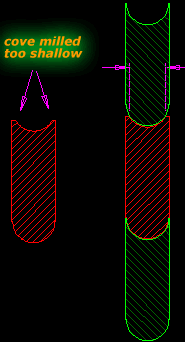 |
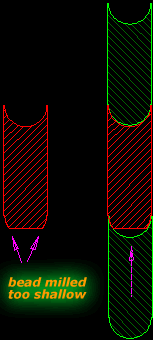
A similar problem as
above but you will notice it very easily. The beading bit did not form
the cove deep enough. This can happen very easily with hardwood. Note
that the beading bit takes much more material out of the strip than the
coving bit. |
| INDEX |
| Home | Kayak Designs | Kayak Shop | Materials | Kayak Gallery | About us |
| Building Manual | Plans | Sandwich Core | Wood Kayak | Order | |
| Epoxy Test | Abrasion Cloth | Rudder | Resources | Choosing Kayak | Guestbook |
If you notice any problems with the site (i.e. error links, missing images) please, let me know. Thanks
Mail:
Vaclav Stejskal
58 Wood Ln.
Acton, MA 01720
USA
Tel: 781-481-9261
© 1999
- 2024 Copyright Vaclav Stejskal
All rights reserved
Last page update:
9 May 2024