
|
||||
| INDEX | next
|
 |
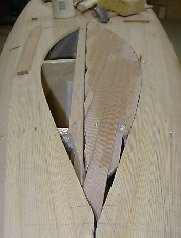
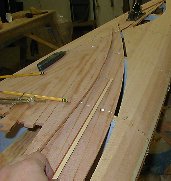
Another
way of doing intricate inlays without spending any time on precise mitering of the strip ends is
using Japanese pull saw. First the curves are laid out with a pencil and a flexible spline (batten) that is stapled to one side of the centerline. The shape is then transferred symmetrically to the other side using the centerline as a frame of reference or a 'mirror plane'. Using a pullsaw the shape is cut out in ten minutes. |
 |
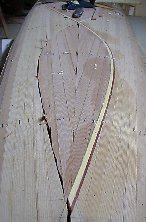
The
next step is to decide on the direction of the 'fill' strips, in this case 3/4" wide redwood.
Because of the relative flatness of the aft deck there was no need for bead and coving. One half of the shape is filled so that it overlaps the centerline completely (see the reference strip on the left). The strips are only roughly shaped by a utility knife so that the gap between them and the deck is narrower than the 'insert' strip that is going to be set in later. In this instance less than 3/8". |
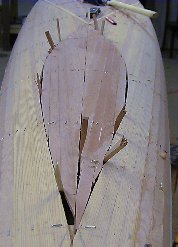 |
Ripping
the first half along the centerline preserves the frame of reference after the station alignment
lines disappear from view. The other half is filled the same way. Here again, you can decide whether to mirror match the strips on the centerline or do it the easier way and insert a centerline strip later on. The small wedges sticking out of the joints press the strips together since there are few stations to staple the strips to. Also, they keep the filler strips fair and even with the main body of the deck until the glue sets. |
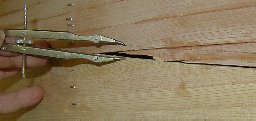 |
Here I am using a compass to transfer the width of the 'insert' strip. Another way to do this is to use the strip itself as a template for the cut line. |
 |
Razor cutting in progress. |
 |
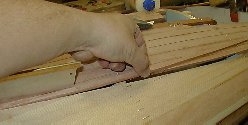
The insert strip is dry fit into the slot from one end to the other. A few passes with a block plane here and there are often needed to get the strip in. It is better to make the slot intentionally smaller then to fill big gaps later. |
 |
After a good dry fit,
glue is applied to the sides of the slot and the strip is set in. |
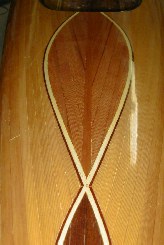 |
Completely finished inlay of redwood glowing under six coats of varnish. Exposed to sun the redwood will become progressively darker with time. |
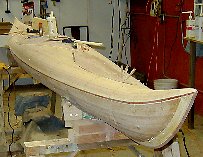 |
There are about ten precise miter cuts of the strip ends in this entire kayak. All inlays including the stems were done by the pull saw. Joints without gaps and speed of construction are the hallmark of this method. This Cape Ann Storm is exactly 2 weeks old at this stage. |
| INDEX |
| Home | Kayak Designs | Kayak Shop | Materials | Kayak Gallery | About us |
| Building Manual | Plans | Sandwich Core | Wood Kayak | Order | |
| Epoxy Test | Abrasion Cloth | Rudder | Resources | Choosing Kayak | Guestbook |
If you notice any problems with the site (i.e. error links, missing images) please, let me know. Thanks
Mail:
Vaclav Stejskal
58 Wood Ln.
Acton, MA 01720
USA
Tel: 781-481-9261
© 1999
- 2024 Copyright Vaclav Stejskal
All rights reserved
Last page update:
9 May 2024