
|
||||
| INDEX | next
|
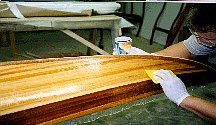 |
Squeegee
time. Having completely wetted-out one half of the hull, the fiberglass must be pressed tightly
against the surface. It is not immediately apparent but the resin floats the cloth and stays trapped
underneath. Using the squeegee, the resin is forced out with sequentially overlapping parallel swipes. |
 |
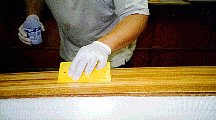
After
every swipe, the squeegee is run through a slot in a cardboard can to remove the bead of excess
resin. This step is vital so that the squeegee doesn't contaminate the already cleaned sections. The inside kayak will require multiple passes to get the resin out. The resin pools on the bottom but pressing too hard just lifts the cloth off the surface. Trapped epoxy doesn't contribute anything to the structure except dead weight. |
 |
With
a little practice, you will be able to control the amount of resin in the fiberglass. Starving the cloth and wood results in poor adhesion and over-saturation makes for a heavy kayak and bumpy surface. The amount of resin on the squeegee shows whether there is too much of it or not enough. |
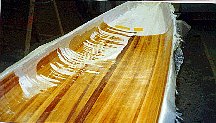 |
The
inside surfaces require a different technique. A large batch is poured inside. The procedure here
is similar but the wet-out and squeegeeing need a bit more care and attention. The cloth is easily
dislodged with too much squeegee pressure. Note, that unlike the outside surfaces, both sides are
done at the same time. The pooling epoxy makes no distinction between the left or right boundary
so it is better to do both sides together. 'If you can't fight them, join them!' Swiping alternately from the keel to the sheerline and vice versa gets the resin out easily without sliding the fabric around. Watch out for late forming bubbles. Now that the outside surface is sealed the trapped air (curing epoxy heats up and expands the air pockets) has no place to escape but through your fresh lay-up. Also, some pinholes may not be filled and the epoxy slowly trickles in displacing the air bubble. |
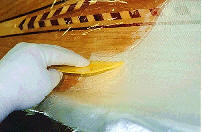 |
Resin
starvation is never a problem here. Spread the epoxy as thin as you can
right from the beginning. The inside surfaces need no extra epoxy coats to hide the weave of the fabric. The only place that should have more protection is the cockpit area as well as the under deck around the knees and the hatches. Find tips and how different epoxies look on the Epoxy Test page. |
| INDEX |
| Home | Kayak Designs | Kayak Shop | Materials | Kayak Gallery | About us |
| Building Manual | Plans | Sandwich Core | Wood Kayak | Order | |
| Epoxy Test | Abrasion Cloth | Rudder | Resources | Choosing Kayak | Guestbook |
If you notice any problems with the site (i.e. error links, missing images) please, let me know. Thanks
Mail:
Vaclav Stejskal
58 Wood Ln.
Acton, MA 01720
USA
Tel: 781-481-9261
© 1999
- 2024 Copyright Vaclav Stejskal
All rights reserved
Last page update:
9 May 2024