
|
||||
| INDEX | next
|
 |
After all filling and
sanding is done, the surface should be vacuumed and lightly wiped
off with a tack cloth. You will be surprised how much dust is still left.
( I was reminded that epoxy manufacturers recommend against using tack
cloth for it might produce a bad reaction with epoxy).This
has never been my experience. If you press fresh tack cloth into the surface
so hard as to leave waxy streaks, then who knows? Older and dustier tack
cloth will be perfectly OK. Using dusty cloth for varnishing is a different
story. |
 |
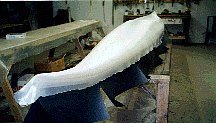
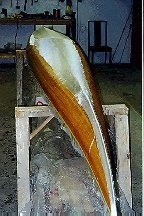
The
issue of fiberglass contouring the stems is far less problematic in kayak construction than it is
for canoe builders. I rarely need to cut the cloth at the ends to conform. This can be clearly seen
in the photo of the bow. Sometimes it is necessary at the stern, but it mostly happens beyond the
boundary of the rudder block. Trim the glass with a margin of an inch or two and smooth out all ripples and wrinkles. |
 |
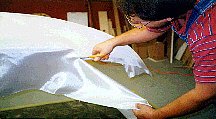
Getting
out all wrinkles is a bit harder on the inside. The important thing here is to prevent the epoxy from getting into the cove of the sheer strip. Cover it along the entire length with a 3/4" masking tape. It doesn't matter that part(~1/4" ) of the sheer strip on either side will stay unglassed. This will be addressed when the shells are bonded together. Note the black 'drip skirt' to protect the already finished outside hull. |
 |
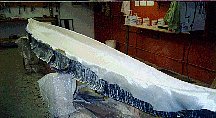
The
inside deck is pasted from three leftover pieces of fabric, the compromise being money saved versus
ease of work. My rule of thumb about this is to always use one piece of fabric on the outside of the kayak and leftover pieces on the inside if necessary. The problem with using several pieces goes beyond the frustration over unraveling edges. The main issue is that you must overlap the sections (~2") without sanding them down. Nobody will see it on the inside of the kayak but it would look unacceptable on the outside. |
 |
Bias
cut cloth provides further reinforcement to the keel line and the stems. Again, it is made of several
segments. Sanding through overlaps in this abrasion patch poses no threat to the integrity of the underlying main cloth cover. In fact, the overlaps on the abrasion patch are important because when they get sanded down the surface will be fair. Butting the fabric together edge to edge will force you to fill the groove between the sections later. It just adds more unnecessary work. The stern keel of single kayaks can be protected with an additional layer of glass or 'abrasion resistant fabric' because it is subject to more abuse during launching. |
| INDEX |
| Home | Kayak Designs | Kayak Shop | Materials | Kayak Gallery | About us |
| Building Manual | Plans | Sandwich Core | Wood Kayak | Order | |
| Epoxy Test | Abrasion Cloth | Rudder | Resources | Choosing Kayak | Guestbook |
If you notice any problems with the site (i.e. error links, missing images) please, let me know. Thanks
Mail:
Vaclav Stejskal
58 Wood Ln.
Acton, MA 01720
USA
Tel: 781-481-9261
© 1999
- 2024 Copyright Vaclav Stejskal
All rights reserved
Last page update:
9 May 2024